La Crosse Technology 308-1414B: The Best Budget Home Weather Station?
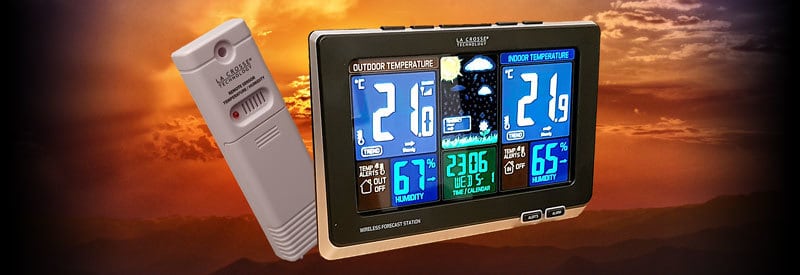
With my Ambient Weather WS-2902A Osprey now running smoothly for more than six months, I realized I needed a weather station in my study to keep an eye on my local region's atmospheric conditions. At this point, the La Crosse Technology 308-1414B grabbed my attention.
OK, full disclosure first. The La Crosse 308-1414B is not my first or primary weather station, as you would have been able to gather from my first sentence in the introduction.
My primary weather station, the Ambient Weather WS-2902A already meet all the demands and functionality needed from an advanced to a professional weather station. After six months, my initial impressions were just reinforced.
(If interested, you can read all about the Ambient Weather WS-2902A Osprey in this article.)
This means I already have a high-end weather station that provides me with all the meteorological sensor data, online connectivity and data logging I require for my weather research and observation.
I only required a basic home weather station that could display essential meteorological data like indoor and outdoor temperatures, indoor and outdoor humidity, and weather tendencies that can be quickly and clearly viewed.
After some research, it became clear that the La Crosse 308-1414B is a very popular weather station that came highly recommended. It also fitted my budget for what I considered to be a quality entry-level station.
The Lacrosse display console is now sitting proudly on my desk, fitting in seamlessly between all the high-tech and desktop screens.
Get more information and pricing on the La Crosse 308-1414B by following this link.
The La Crosse 308-1414B In A Nutshell
For those of you not familiar with La Crosse Technologies, the company is known for manufacturing high quality entry-level to intermediate weather stations, while managing to keep prices affordable at the same.
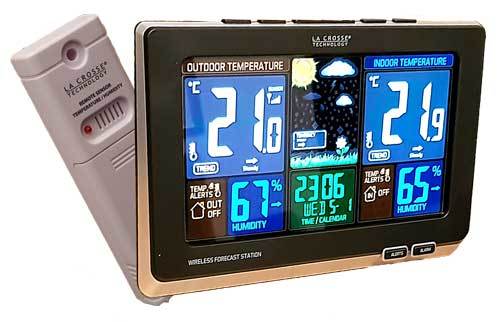
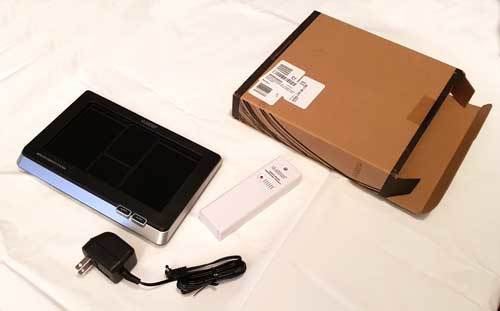
This La Crosse weather station is one such example. It comes in a plain, but well-packaged box, revealing a classy display unit, outdoor weather sensor, an AC adapter, and a small setup leaflet.
The 308-1414B comes with an indoor & outdoor temperature sensor (connected via a wireless connection), an indoor & outdoor humidity sensor, alarm clock, and date display, as well as weather tendency indicators.
And this is all the beginner weather enthusiast needs. The La Crosse 308-1414B ticks all the boxes. It may not have all the weather sensors for measuring every possible atmospheric variable, but no novice needs it. It's affordable enough for you to upgrade at any time.
For me it is just perfect as a second unit that sits neatly on my desk, ready to provide me with the weather essentials, while my advanced weather station is doing the heavy lifting elsewhere in the home and outside.
What follows is my experience with setting up the La Crosse 308-1414B weather station, followed by my impressions, and conclusion.
Packaging And Components
Packaging
As I already mentioned, the La Crosse 308-1414B comes in a plain cardboard box without as much as a picture or graphics on it. (Unlike my Ambient Weather Osprey weather station and the Davis Vantage Vue which came in colorful boxes, covered with images, graphics and text information.)
Clearly, the plain packaging reflected the no-frills approach of La Crosse which runs through the whole weather station, from design to setup. But that is a good thing!
The box contains the main display unit, outdoor sensor, AC adapter, and a small setup guide. What is evident right from the start, is the care that was taken to make sure all the components were safely and tightly packaged. Already a good sign.
Indoor Weather Display
The black display unit looks and feels surprisingly solid and well-built. It even looks classy and upmarket, but the biggest surprise came when I switched on the screen...
I wasn't expecting this level of brightness and clarity from an entry-level weather station. It even literally outshines my Ambient Weather display, costing six times more. This says a lot for a display unit in this price range.
(Yes, a personal weather station shouldn't be judged by its display quality, and Ambient Weather WS-2902A Osprey is known not to have the best display on the market, but it is still a noteworthy observation.)
The display is powered by 3 AAA batteries, or an AC adapter, and can be hung against the wall or put on a flat surface using the built-in stand.
The buttons operating display can be found on the up and front of the console:
Five buttons for setting up and making adjustments to the station is situated on the top of the unit, with two buttons placed on the front of the display.
The two buttons you may use more frequently are conveniently placed on the front:
- Alerts Button: Pressing and holding this button allows you to adjust the values which will trigger an alert when exceeded.
- Alarm Button: Pressing and holding this button allows you to set the alarm, or enable/disable it completely.
The five buttons on the top of the display will probably be used less frequently, but are still easily accessible and well organized:
- Arrow Keys: These buttons can be found on the outer left and right sides, and are used to adjust the values of any setting you want to change.
- Time Set Button: Situated second from the left, this button will only be used when setting up the weather station for the first time, or when you need to make any changes to the original settings.
- Snooze/Light Button: Conveniently placed in the center of the display and also larger than the rest, this button is used to snooze the alarm. It also functions to switch on the display or change the brightness settings (depending on whether the AC adapter is plugged in).
- Heat/Dew Button: Situated second from the right, this button display the Heat Index when pressed once. Press it twice and the Dew Point is displayed.
The layout of the display is pretty self-explanatory, but here is a brief is summary:
- The outdoor temperature and humidity values are situated on the left of the unit, while the indoor temperature and humidity values can be found on the right. This includes each one's trending and alert indicators.
- The weather forecast icons take center stage and are placed in the upper-middle part of the screen.
- The time and date settings occupy the bottom-middle part of the screen.
All these elements combined, result in a well laid-out and easy to read display console with a premium feel.
Outdoor Sensor
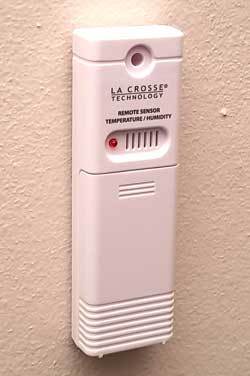
The outdoor sensor comes in the shape of a plain white rectangular container, with no standout features. A battery compartment housing 2 AA batteries, as well as a red LED light can be found on the front of the sensor.
The plastic feels relatively sturdy and will definitely be able to withstand a knock or two. A hole in the top of the unit and the flat surface on the back of the sensor gives you a variety of options to hang or mount it against a wall or other vertical surfaces.
Setup Guide And AC Adapter
Here it is pretty much a case of "what you see is what you get". The AC adapter allows the display's backlight to be permanently switched on at various brightness levels.
The setup guide comes in the form of a small, folded piece of paper, printed on both sides. This already gives you a hint of the quick setup and ease of use that makes this La Crosse weather station so appealing.
Installation And Setup
Sensor Setup
The setup guide simply recommends for the outdoor sensor to be placed in a shaded outdoor location. I think a little more information can be helpful here, especially for the novice user.
Since the sensor broadcast both humidity levels and temperature to the indoor unit, care should be taken to place unit in position where it will not be influenced by artificial sources of heat and moisture.
If you are unsure, you can find all the information you need about where to place your outdoor weather sensor placement in this article.
Once you decided on the right location and method of fastening your sensor, just make sure your 2 AA batteries are correctly inserted (the red LED will flash after installation) and you're good to go.
Display Console Setup
Setting up the indoor display is surprisingly quick and easy. (Obviously, I am used to the setup of much more complex weather stations like the Ambient Weather WS-2902A Osprey and Davis Vantage Vue).
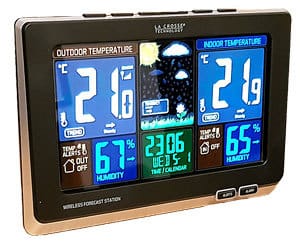
It literally takes no more than five minutes to set up the display unit. Simply hold in the "Time Set" button at the top of the unit until the time display starts to flash, and follow the setup guide to quickly set the time, date, and temperature units.
Please note, the WWVB function, which allows the clock to be kept accurate after setup, only functions in North America. If you live in another part of the world, you may want to keep this feature switched off and just set up the time manually.
Here my only criticism against the small setup guide is that not enough information is given for the correct placement of the indoor display console. Many artificial indoor sources of heat and humidity, like stoves, baths, and electronic equipment can influence your readings.
For a complete guide on how to locate the best place to put your indoor weather station, you can read it in this article.
Performance, Quality And Accuracy
Much of the information in this section has already been mentioned elsewhere in the article, but summing up this La Crosse's weather performance and accuracy in one section will give you a better idea of how it actually performs.
Quality
Much has already been said about the quality of the display console. It is one of the brightest and easy-to-read displays I used thus far. This does not mean it is the best display on the market, but for a budget weather station, this is exceptional.
The buttons on the console also have a sturdy look and solid feel to it. They are logically laid-out and easy to use. The kickstand for the display works well too and allows your unit to sit on a desk securely.
The only other component is the outdoor sensor. There is nothing special about it but does what it is supposed to do. It looks and feels solid enough to handle some rough treatment, and the design makes it easy to be mounted in almost any vertical position.
Performance And Accuracy
Even though the La Crosse 308-1414B only measures temperature and humidity, it seems to be more than accurate enough, especially for the beginner weather enthusiast.
Only time will be able test these initial impressions, but one way of quickly establishing relative accuracy is by putting the indoor display console and outdoor sensor next to each other and observe how much they correlate or differ.
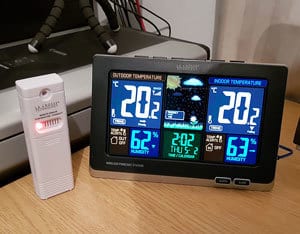
I was very surprised to find that the two units managed to measure exactly the same temperature. (See accompanying picture.) It's not a perfect test or proof, but definitely looks very promising.
The strength and speed of the signal between the outdoor sensor and the indoor unit are also impressed. Not only was the sensor signal picked up by the indoor unit in seconds, but it also managed to keep this connection through several concrete walls.
Does this mean that this is the perfect budget weather station on the market? Not at all!
Anyone who has read the majority of articles on this website will know I consider three variables crucial to make a proper prediction or forecast of future weather conditions:
- Temperature
- Humidity
- Barometric Pressure
Clearly, the La Crosse 308-1414B do not have a barometer, which really would have made this the perfect budget weather station for me.
The other "shortcoming" is the absence of WiFi connectivity, which makes the logging and storing and weather of conditions impossible.
But taking into consideration the low price and quality of the weather station, it really can't be faulted as a beginner station. Too many sensors and WiFi connectivity may be a bit overwhelming for the beginner weather enthusiast.
To help you get a quick overview of the advantages and disadvantages of the 308-1414B, you can take a look at the comparison chart below.
ADVANTAGES
Quality Design & Construction
Ease Of Use
Clear And Well Laid-Out Display
Accurate Readings And Measurement
Atomic Clock For Accurate Time Keeping
Ideal For The Beginner
DISADVANTAGES
Too Basic For The Advanced User
Absence Of A Barometer
No WiFi Connectivity
Get more information and pricing on the La Crosse 308-1414B by following this link.
Conclusion
To be honest, what an unexpected surprise this budget weather station turned out to be. I was only looking for a little backup weather station to monitor the basic weather conditions without leaving my study/studio.
I already provided more than enough evidence of why I am so impressed with the La Crosse. I also highlighted some features I missed on this device that would have been nice additions, but not crucial for an entry-level system.
So, the question remains, will I recommend this weather station. If you are an intermediate or experienced weather enthusiast, then definitely no. There are just too many features missing that you as an advanced will need to study all aspects of the weather in your area.
But maybe you are just a casual weather observer that's just interested in basic weather conditions, or a novice weather enthusiast who wants to get your feet wet first, and have the resources to upgrade to something more advanced later.
In the latter case, absolutely yes! I am very sure you will never be sorry for choosing the La Crosse 308-1414B as your starter or secondary weather station!
Feel free to leave me any comments, questions or suggestions, and I will get back to you as soon as possible.
Remember to join my Mailing List to be informed whenever a new article is released, and share new developments and helpful hints & tips.
Until next time, keep your eye on the weather!
Wessel

